


Shelter is one of the primary needs of all people, secondary only to water and food. The shelter is needed to keep you safe from wind and weather and provide a warm, dry place to rest and recuperate. During an emergency without electricity, many modern homes will still keep the weather at bay but may prove insufficient against the onslaught of frigid temperatures.
Even during short power outages, many people died when snow and ice disabled the electricity their furnaces needed to keep their homes warm. For example, in 2012, a woman in Chicago died when a snowstorm knocked out the power and turned her home into an icy tomb, and she was but one of 5 deaths during that winter season! Furthermore, emergencies can leave your home in shambles: Hurricanes and tornadoes frequently tear roofs off homes, and earthquakes can bring whole rooms down.
Thankfully, there are ways to keep warm when your home’s walls are insufficient to keep the proper temperature or even destroyed outright. Common household materials can show you how to build a survival shelter inside the one you already have, protecting you from the chill.
How To Build A Shelter With Certain Essential Elements
The build suggested here is one design of many that could be attempted. Depending on your needs, you could modify or expand on this concept to fit what you and your family would require. Indeed, you could even add additional improvements to create a shelter suitable for rougher use outside if the need arose. Remember these essential design elements when crafting your homemade shelter.
- Repel wind and drafts at all costs: If you’ve been outside in cold weather, you know that sharp, chilling winds can make even 40-50 degree temperatures unbearable within a few hours. The wind chill is deadly and can greatly speed up the onset of hypothermia and frostbite.
- Keep water at bay: Water can be more difficult to deal with than wind in some cases, particularly if the disaster requires that your shelter be exposed to rain.
- Contain your body heat: Although a fire or other heat source can help, the chief goal is to ensure that you don’t cause your body temperature to drop. Not only can hypothermia and frostbite result, but the additional energy required to maintain proper inner heat against the cold constantly also burns off extra calories you may need.
- Layers are your friend: It can be tempting to trust in a few thick layers of material, but in many cases having many thinner layers can be much more effective at keeping you warm and dry.
- Be careful with open flames and other heat sources: Many of the common materials you will use will be flammable. Be intelligent and careful when using any heat sources, but particular care should be taken with candles, oil lamps, and campfires with an open flame.
Gathering Materials You Need To Build A Shelter
Now that you’ve got some essential ground rules, let’s look at our materials. The shelter has three key layers, and each will need different design considerations and materials.
The Outer Layer: This can somewhat contain heat but is mainly designed to protect you from the world outside. Primarily, you’ll want to look at cardboard (the thicker and more durable, the better) or Styrofoam (if not common around your house, many building sites and craft and hobby store dumpsters would be a good Styrofoam scavenging source during an emergency) and coat it in several layers of plastic wrap.
Crumpled paper is a great insulator and pretty easy to find. The wrap helps cover up corners and reduce drafts and protect vulnerable cardboard from rain and melting snow. Naturally, you’ll also need a fair amount of duct tape to keep everything together.
The Middle Layer: Technically should be multiple smaller layers, and they can all be made of the same material. With the rain and wind taken care of, the middle layer is intended to create dead airspace between you and the outside world.
Foam, crumpled newspapers and magazines, and any other loose packing material do a great job here. The key here is insulation, so any material designed to insulate your home can also work here.
The Inner Layer: This is the layer you’ll be touching directly on the inside, and as such, it needs a few special considerations. Besides adding additional insulators, you need a comfortable resting place and the ability to clean it out periodically. Pillows, blankets, and big thick couch cushions make for a comfortable shelter and keep you off the heat-leeching floor.
Additionally, you can remove them when needed to air them out and wash your sweat out of them. If you have a futon or even a small foam mattress, these can also work great.
Optionally, fix up the “Home Layer”: There are three layers to your shelter, but the room you choose to build it in may also require some reinforcement. Plastic wrap and crumpled newspaper on all the windows in that room act as additional insulation, making your shelter all the more snug.
A few rags stuffed under the doorways leading to the room can also help prevent heat from escaping. I call this optional because depending on how snug your shelter becomes, you may wish to allow a small amount of cold in if it becomes stifling.
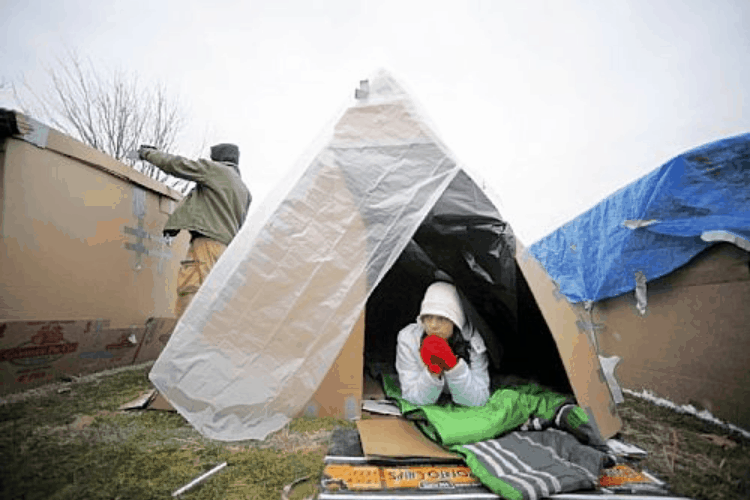
How To Build A Simple A-Frame Shelter
A-Frames are a common way of constructing a shelter when building structures out of natural materials like leaves and sticks out in the wild, and they’ll serve you well here. The triangular shape is strong, and it’s extremely easy to make with cardboard or foam sheets.
- Determine how many people need to fit in the shelter: Obviously, a little A-frame designed to keep one person warm will need less material than one designed for a family of four. A single older TV or refrigerator box usually holds one person, but you must tape several boxes together to accommodate a family in a single shelter.
- Fold your boxes into a roughly triangular shape: If you’re using flat sheets of cardboard or Styrofoam, you’ll need to tape them into the proper shape, while reused boxes need to have a single side cut free to fold in and make the triangle.
- Cut a triangular “back door” and cover it in insulating material. Attach by taping it to the back of your shelter: This “door” doesn’t have to be removable if you don’t need it to open, but it does need some newspaper or triangular piece of foam attached to the inside to insulate it thoroughly. If you would like it to open, ensure you only tape one side to form a “hinge” and make a handle out of a cord or rope for easy opening/closing.
- Cover the outside in plastic wrap, trash bags, or other water-resistant material: I recommend this even if you don’t plan on exposing the shelter to the outside. The plastic can help maintain heat somewhat and protects the cardboard from incidental spills. It is a slight buffer between flammable cardboard and other heat sources.
- Attach your middle layer of insulating materials to the inside walls: Large foam pieces can be stapled or taped directly. It can be easier for smaller insulators like newspapers to tape some trash bags to the inside walls, leaving the openings filled with the smaller pieces before sealing them shut with tape.
- Cover the floor with insulating material from your Inner Layer pile: it is time to break out the cushions or blankets and cover the shelter floor. Remember, you can lose a great deal of heat via the floor while sleeping, so protect yourself thoroughly.
- Cut a front door to your new shelter: Do not add extra insulation to the door. It would help if you had a place for moisture from your breath to escape, so you want a few small cracks and drafts by the front door to cycle some fresh air inside. Again, use some tough cord or rope for a handle on the inside and outside of the door so you don’t keep bending the cardboard to open and close it.
- Reinforce all joints with tape for durability:
- Enjoy your toasty new home: On average, your body temperature alone can increase the heat of a smaller shelter by as much as 20 degrees Fahrenheit, potentially more people you have with you.
Some Helpful Tips When Deciding How To Build Your Survival Shelter
- You can always build multiple smaller shelters next to one another if you are having trouble keeping the cardboard stiff enough to support a larger shared shelter.
- I would recommend building at least two other small one-person A-frames for people who are sick or suffering from injuries since they won’t be able to share the community shelter until they’re better.
- If you wish to have a shelter that can survive the outdoors, you should add several layers of cardboard and tape them together, with plenty of plastic wrapped between each layer to keep the rain from creeping in. The middle and inner layers are largely unchanged unless temperatures are truly horrific (think below 10 degrees consistently), in which case you should pile on as much insulation as possible.
Sources:
https://www.google.com/books/edition/Be_a_Prepper/NkttjwEACAAJ?hl=en